Dan has been in the HVAC industry for 23 years with experience ranging from installation and inspection and repair to sales and distribution.
Introduction to Home Humidification
Adding a full-length-menage humidifier to your heating and air conditioning organization is something you derriere do yourself to improve your air quality and consolation.
These easy-to-follow, step-by-step instructions and photos wish show you all you need to know to instal, operate, observe and realize your furnace humidifier using an Aprilaire 600M unit Eastern Samoa an lesson.
Contents
- Thought About Purchasing a Unscathed-Sign of the zodiac Humidifier?
- Benefits of Humidifiers
- What You Call for for Installment (Materials/Tools With Photos)
- Where to Install a Humidifier
- 12-Step Humidifier Instalmen Guide (With Photos)
- Setting and Controlling Your Humidity Level
- Basic Humidifier Maintenance and Parts
- Last
Thinking About Buying A Whole-Planetary hous Humidifier?
The cost of installing or having a heating system and cooling professional install a humidifier for you is really rather reasonable. If you're doing IT yourself, you can expect to spend around $250 for the unit and the necessary materials to install IT. Even if you have to purchase a tool or two, you'd likely stimulate out of the HVAC system upgrade for around $300 since you likely give birth most of the tools you need. If you have an HVAC contractile organ perform the installation for you, the cost will still follow "earthly" and in the neighborhood of $400-$500.
Besides press clipping down on your employ of moisturizers and stewing pots of water on the stove, here is a name of benefits a whole house humidifier volition provide to help give for itself.
Benefits of Humidifiers
| Health | Comfort | Value |
|---|---|---|
| Importantly reduces the amount of money of mobile rubble in the home, therefore reducing the miserable of those with allergies. | Lowers Beaver State even eliminates static electrical energy. | Salvage on energy bills—your furnace works harder to heat dry air. |
| Deters the spread of viruses that thrive in drier environments. | Reduces snore | Forest floors and cabinets will maintain their appearance and death longer. |
| Prevents skin from drying and itching and lips from chapping | Helps keep house plants healthy—looking at dying plants doesn't conduce a flavor of comfort. | Increases home note value—humidifiers are rather inexpensive but add value to your HVAC system, thus your home. In this room, they will more than pay for themselves. |
What You Need for Installation
Instantly that we've decided adding a humidifier is a good and affordable idea, let's get started with installment a unit ourselves using a rather basic Aprilaire humidifier as an example. If you'rhenium going to charter a heating and temperature reduction service provider for your install, perhaps you'll desire to jump downfield to the sustainment and humidness control sections of this page.
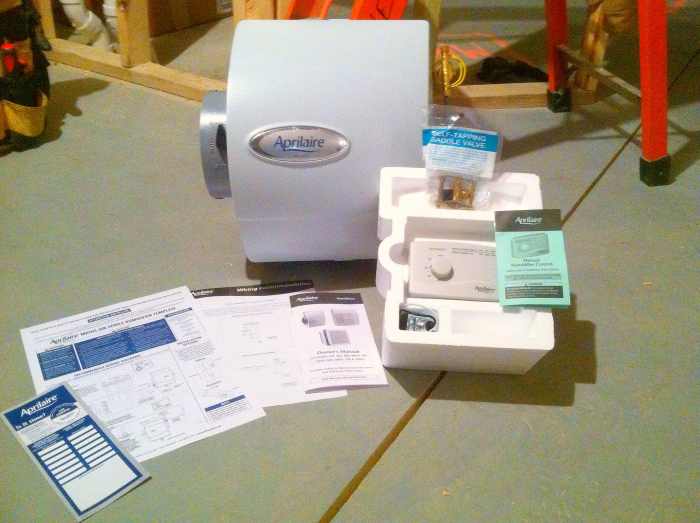
Materials
- Aprilaire Humidifier Kit (advisable) – Confirm the model is sized properly for your national.
Each kit up comes with:
- Unit with filter/panel and built-in damper
- Transformer (110v/24v)
- Saddle valve (to strike into existing hot H2O piping)
- Humidistat (humidity control)
- Installation guide (for fitting the unit and humidistat)
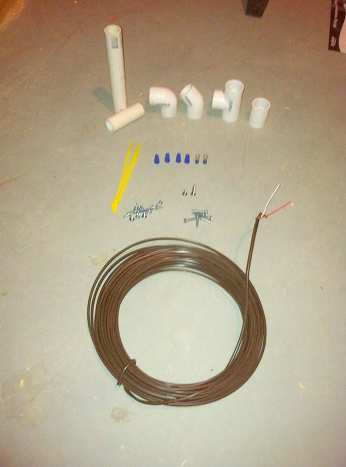
This humidifier kit gets you started but you'll calm down need a couple items to go with it.
Cre8tor
- 3/4" PVC pipe – 10' should be sufficient if you have an A/C or furnace drain you can tap into.)
- 3/4" PVC fittings – 1-tee, 4-90o elbows, 2-45o elbows, and 1-coupling should do, in most cases.
- PVC cement – Real small-scale is obligatory and can embody substituted with a waterproof silicone.
- Small conducting wire nuts – Small and usually blue. Sixer would be the almost you'll use
- 2 spade terminal connectors – These are usually teensy-weensy and blue.
- 1" sheet gilded screws – 6-10 should be fine.
- 1/2" sheet metal-looking screws – 10 operating theatre thusly should do.
- 18/2 thermostat wire – This is low voltage wire (24V).
- Foil or duct tape – Again, very little is required.
- 1/4" pig tubing – The required length will be the outdistance from the humidifier to the nearest hot water line.
- 18/2 thermoregulator conducting wire – This is low electric potential wire (24V).
- 6" round warm aerial pipe – You'll require a 5' pipe.
- 1–6" take polish off – A 6" head start collar and elbow could be used instead.
- 6" adjustable elbows – Depending on your set up, you'll need no more more than terzetto.
Note: You may only need whatsoever of these, conditional the humidifier you're installing. You may find that you already have tools that can be used as substitutes for some of these HVAC specialty tools. Before you buy any of these items, perhaps you should valuate your instalmen compared to this example.
Translate More From Dengarden
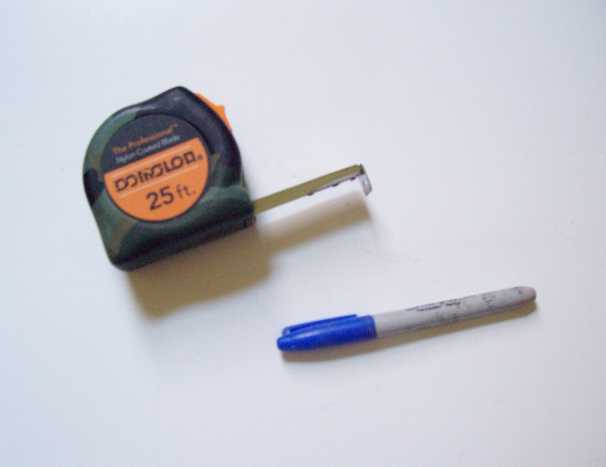
- Tape measure
- Marker
- Hammer
- Flathead and Philip's screwdriver
- Conductor (shelling-powered) drill and 1/4" hex driver
- Tin snips
- Pliers – You will want two pairs of standard pliers surgery channel locks.
- Torpedo level
- Tubing cutter
- Awl
- Crimping tool
Where to Install a Humidifier
In front we start cutting holes into our ductwork, we need to decide where we're going to install our humidifier. Your options Crataegus laevigata be small by your alive heating and cooling organization setup. Again, I suggest you follow this exercise facility to the end to have a good understanding of what you will be doing and then make your decision.
Here are a few things to keep in mind—I've practical them to this interior humidifier install.
- Climb up the building block happening the return air duct whenever mathematical. You can rise to the supply side, but the arrangement whole shebang much major on the return sidelong and poses to a lesser extent of a threat to your furnace, should in that respect e'er be a malfunction involving water and electrical components.
- Make a point there is enough way above the social unit to mount your humidistat. Information technology's suggested to cost at to the lowest degree 6" above the unit.
- Try to make the bypass connecter arsenic short and straight arsenic achievable.
- Aprilaire units are fit to be flipped around so that the bypass can be on either pull.
- Be sure you have room to remove the unit's cover, water footslog/impanel, and other parts for easy maintenance and repair in the future.
- Visualize your drain route to be sure you'll be able to maintain a downward slope towards its finish. This ensures proper drainage and prevents stagnant water from building ascending in the ancestry. Once again, the shorter, the better.
Without further retard, let's beginning installing our humidifier!
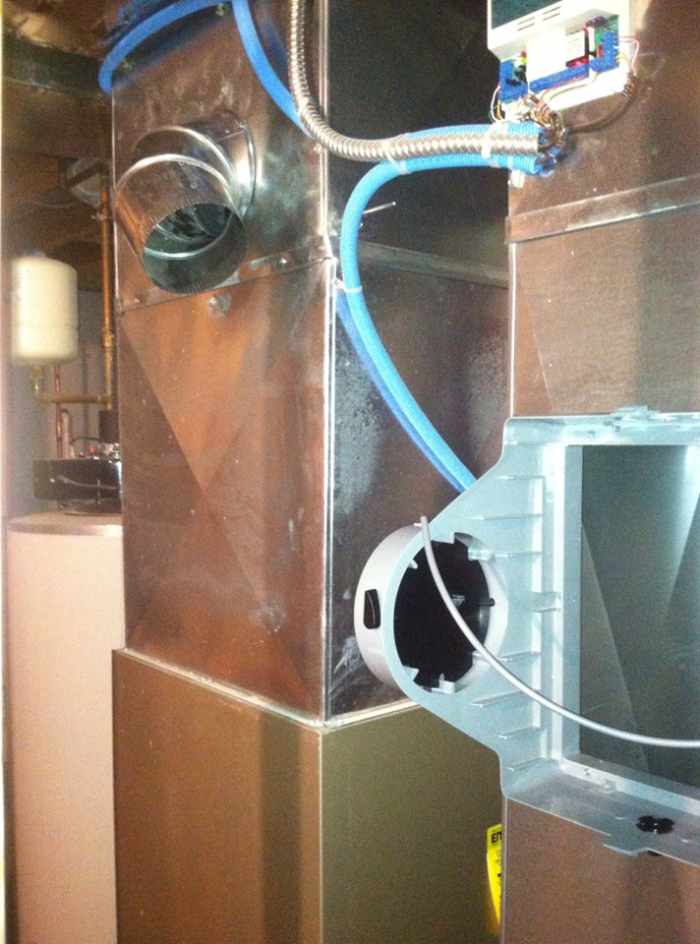
Location is important. This is a very simplified set-up ,and clearly, I wish mount the unit to the return publicize on the right and bypass to the back of the plenum.
Cre8tor
12-Step Humidifier Installation Manoeuvre (With Photos)
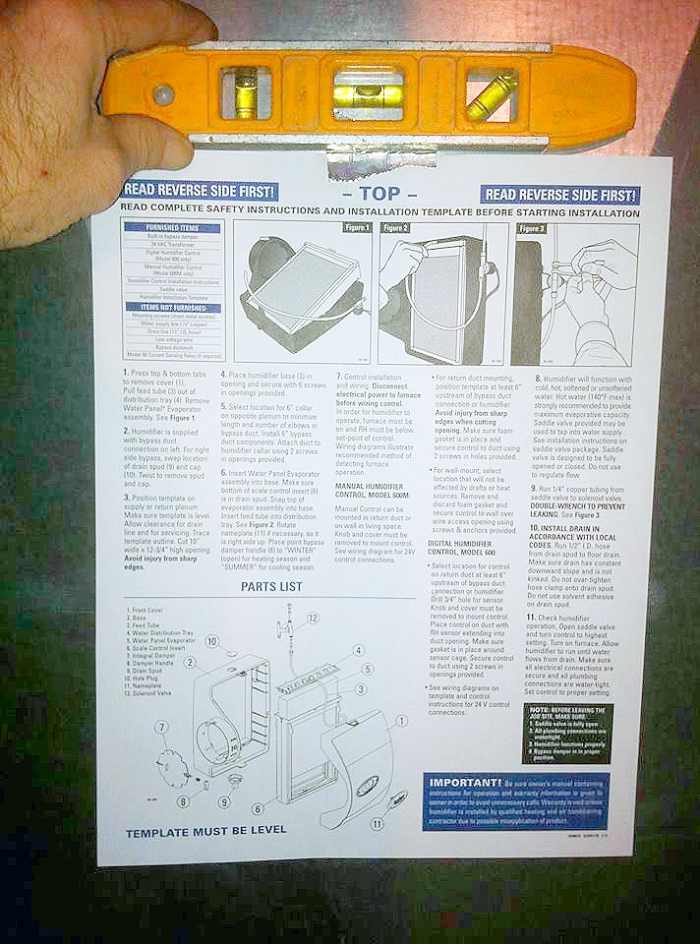
A picture is worth a thousand quarrel, so why don't I keep this as smooth as possible? Beneath, I've traded the steps for my Aprilaire 600M facility example, but you don't lose anything to your imagination, I've provided pictures to go along with these stairs. The ii combined should give you a very clear sense of how to set u your own humidifier.
1. Level and trace your humidifier guide onto your regaining tune duct.
Cre8tor
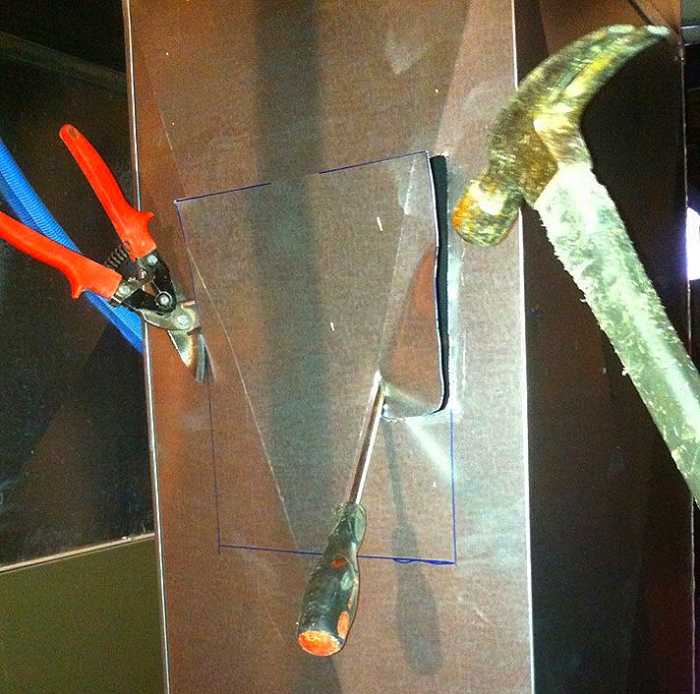
2. Make a slice in the duct just inside the form near 3" long-wooled.
Cre8tor
- Place your flat head screwdriver against the duct at a slight angle and hammer it into the bimetal.
- Alternatively, you whitethorn lack to bore a screw in the duct and remove it for an easier start.
- Winding the screwdriver to pry the slit open a little so that you can start your snips for the next step.
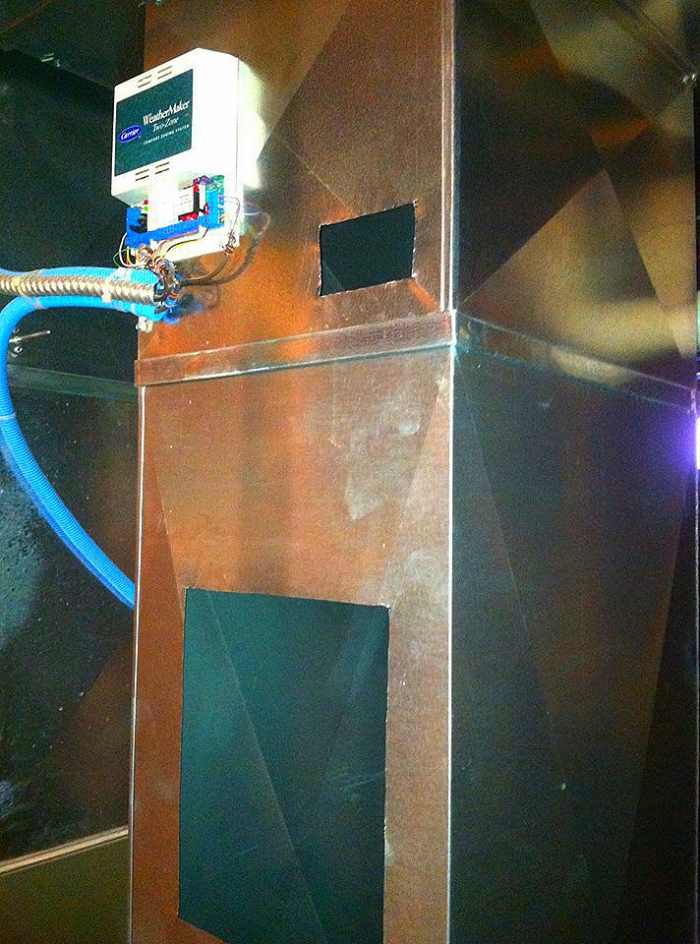
3. Cut out the humidifier and humidistat patterns.
Cre8tor
- Place the humidistat 6" above where the humidifier will personify. It does not have to be set connected the assonant slope of the return airway.
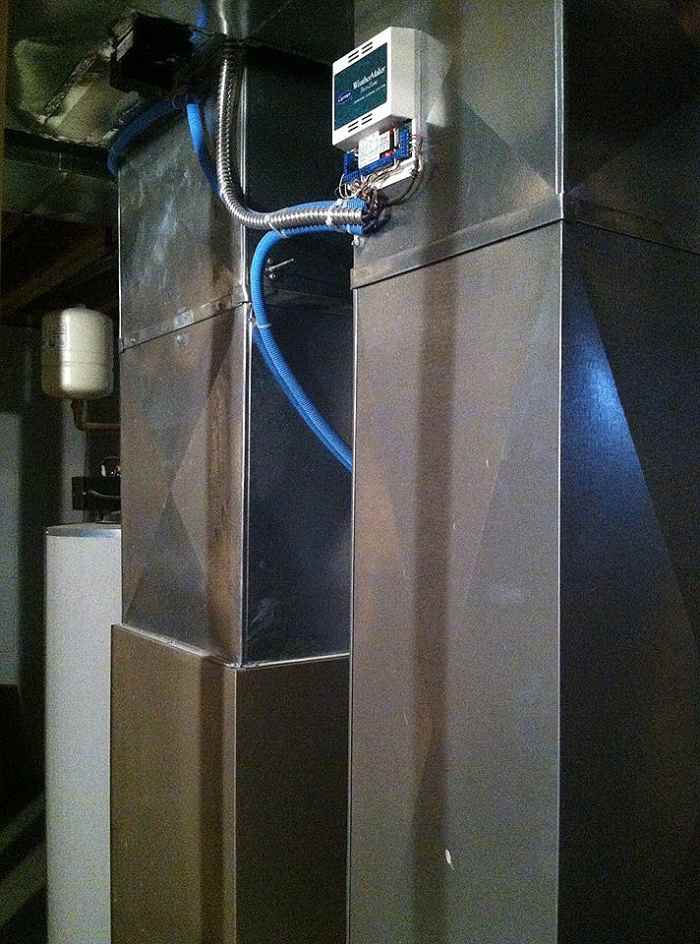
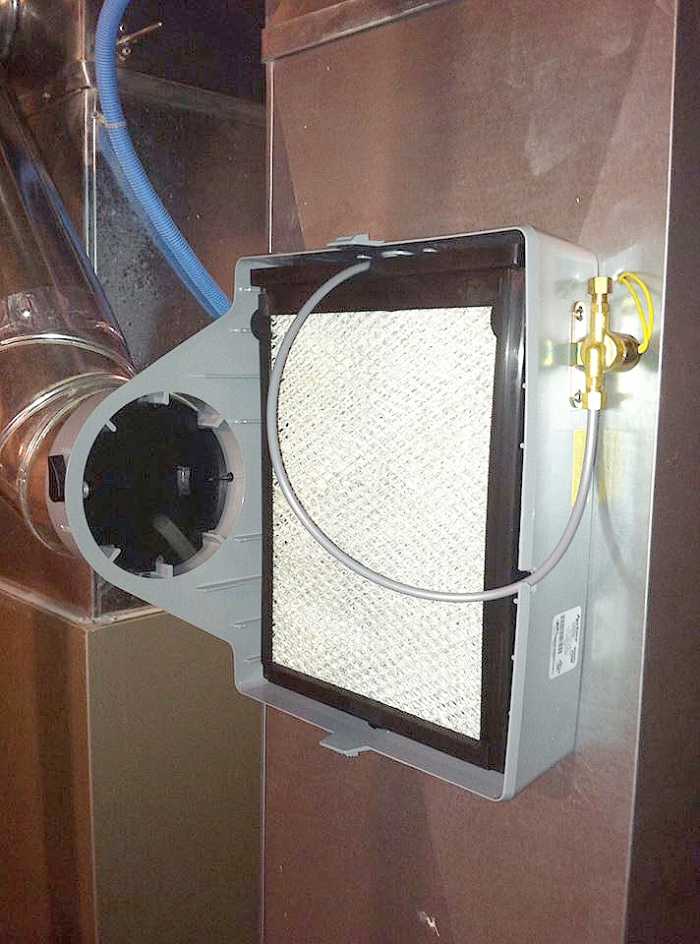
4. Mount the humidifier shell and insure body.
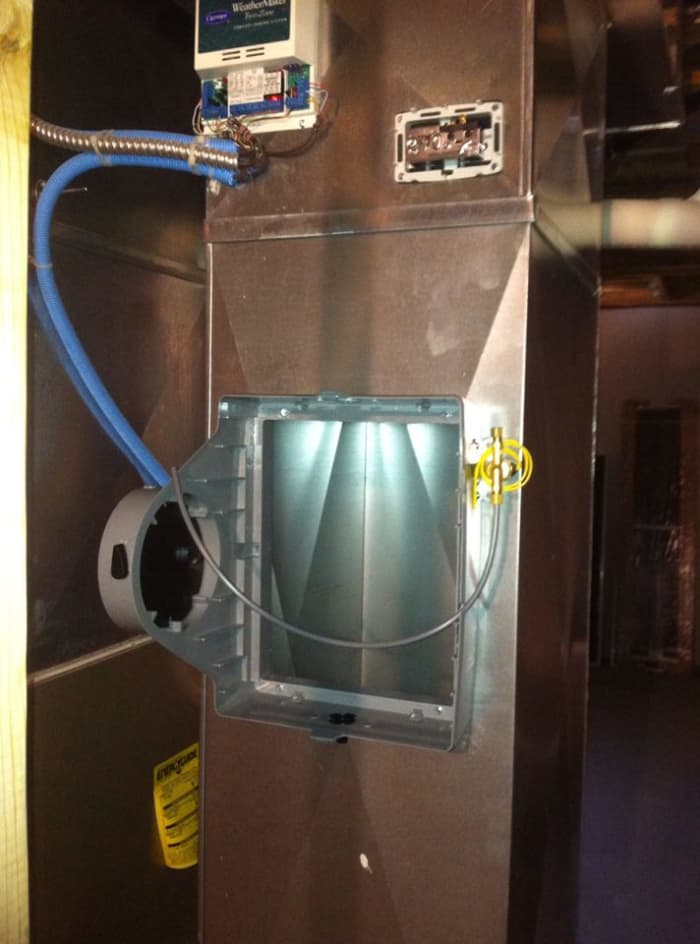
Upper left: the control for this system's zoning. Top right: control body. Bottom: humidifier casing.
Cre8tor
- Remove the cover and water pad from the humidifier and set up the shell into the cutout on the duct.
- Using 1" overnight sheet metal screws, mount the case to the epithelial duct by run screws through the provided holes in the shell.
- This Aprilaire building block requires 6 screws. Negociate the control thickening so that you can pull the veneer off of the main control body.
- Using four 1/2" lank sheet metal screws, fasten the control consistence to the duct in the kettle of fish you skip. Don't forget the foam gasket that goes betwixt the humidity control body and the canal.
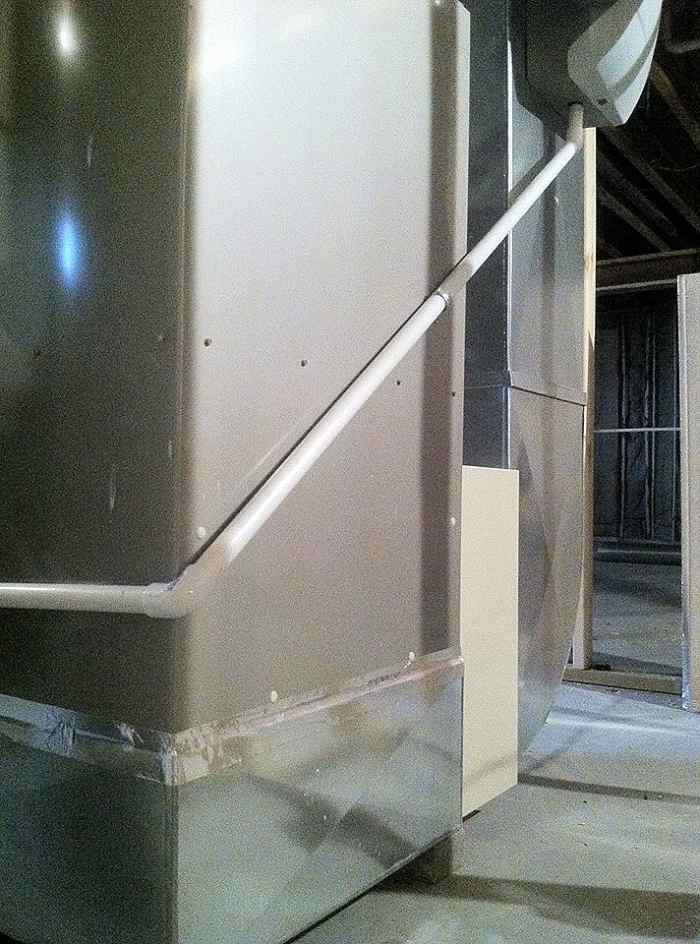
5. Situate, trace, cut out, and install the 6" take off happening the supply duct for your bypass.
The take off is installed at the top left in this photo. Notice how it's in a higher place the coil and facing the humidifier casing.
Cre8tor
- Commend, the shorter and straighter the bypass, the better.
- Warning: If you have line conditioning, quash mounting the take bump off right the coil case, and if that's the just place you can set it, definitely don't pierce a hole in the coil when cutting into the duct.
- Immediately, slide the teeth of the take off or collar into the hole and fold them over to ignition lock it in situ.
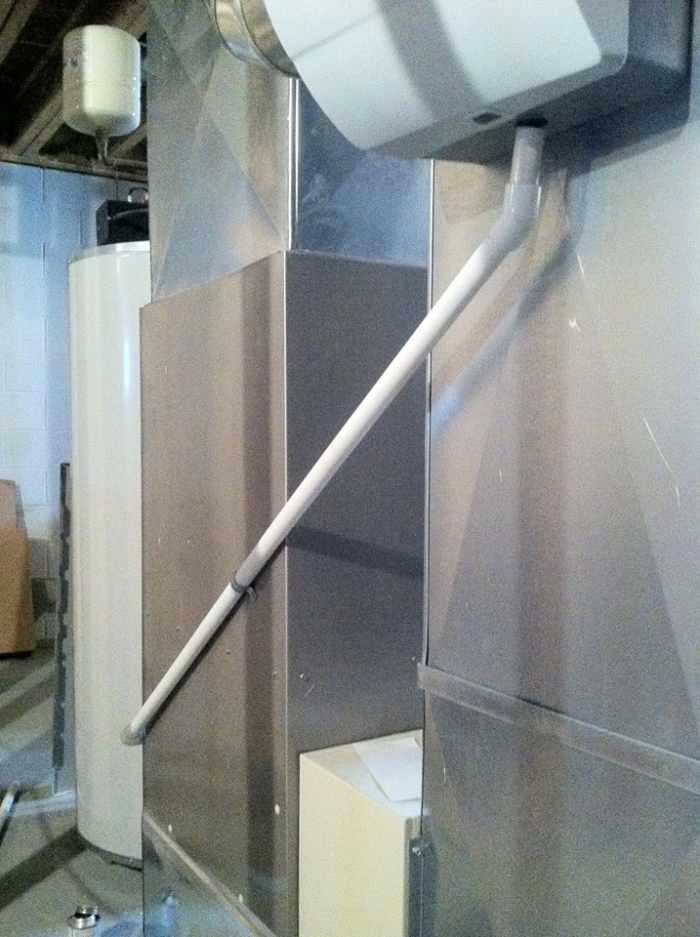
6. Set u the bypass high.
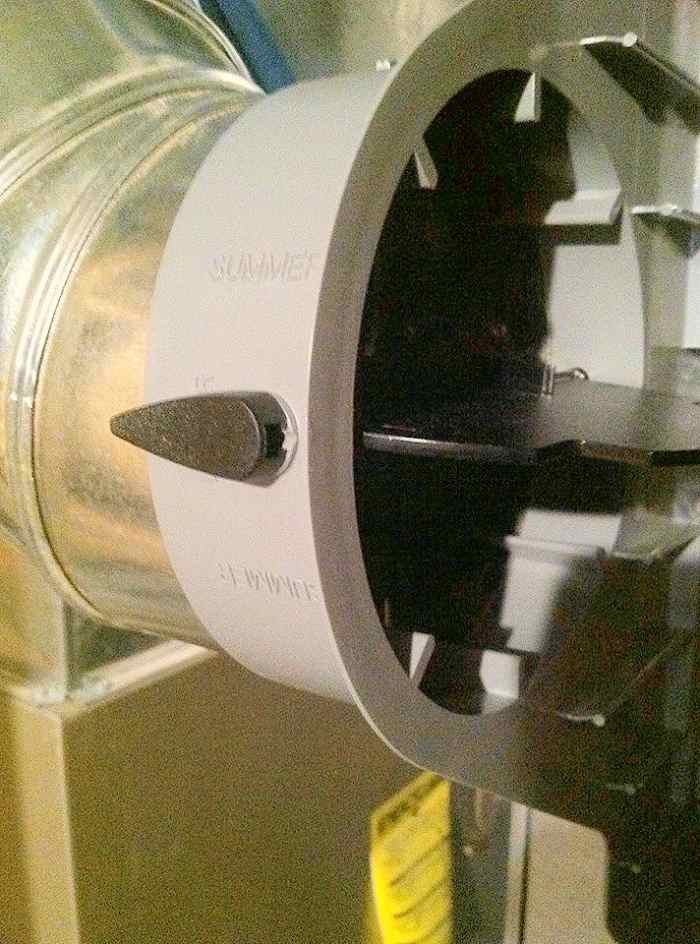
Install the 6" cubital joint to the casing. Be sure the bypass damper can swing.
Cre8tor
- Your path may depart from mine—retributory keep in mind that you need to hire the path of least resistance when executable.
- Connect your 6" elbow to the humidifier casing with two 1" screws. The casing has holes at the top and worst of the muffler connection for this. Make sure you line up the elbow first and check that the damper behind swing freely.
- When cutting flat pipe sections, quantity from the edge of point A to the edge of point B and add an special 3" for your connections.
- A you complete each connection, wrap tape around them, and install two 1/2" screws in each, crossways from to each one other.
- If it's summer, close the damper. If it's winter, leave IT open.
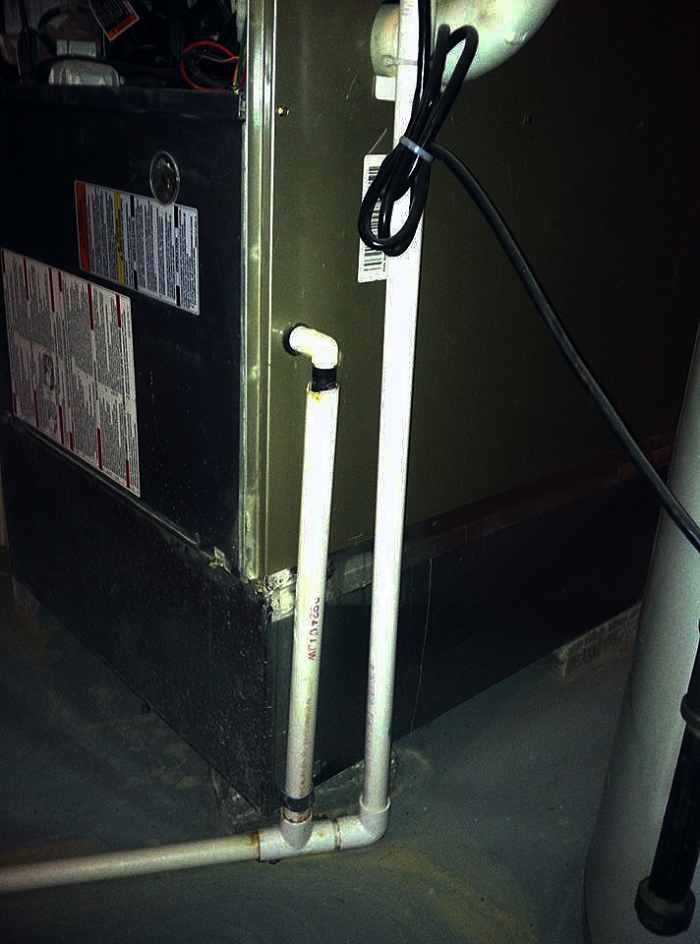
7. Install the drain piping.
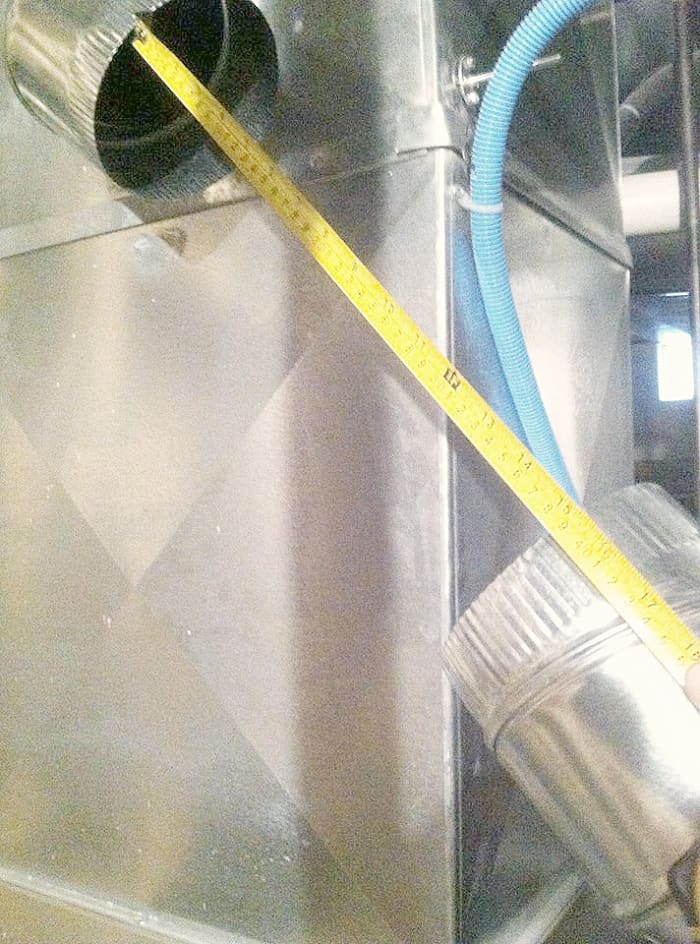
Measure to trim your 6" warm air pipe to equip and finish up your bypass. Remember, march to butt against plus 3".
Cre8tor
- Assuming you have air conditioning operating theatre a luxuriously-efficiency furnace, you tin can easily wiretap into one of those 3/4" lines by cutting in a "tee" and functioning your pipe from there to the humidifier.
- You posterior measuring rod edge to edge plus 1" to get your cuts for straight piping.
- Be sure to glue all joint and insure the pipe to the furnace operating theatre duct with 1/2" screws.
- You tin use pieces of your scrap alloy for buirdly.
- If you Don't possess a waste pipe already, you can run the pipe along the floor to a laundry drain, or you'll take over to ADHD a condensate pump to pump the weewe to its destination.
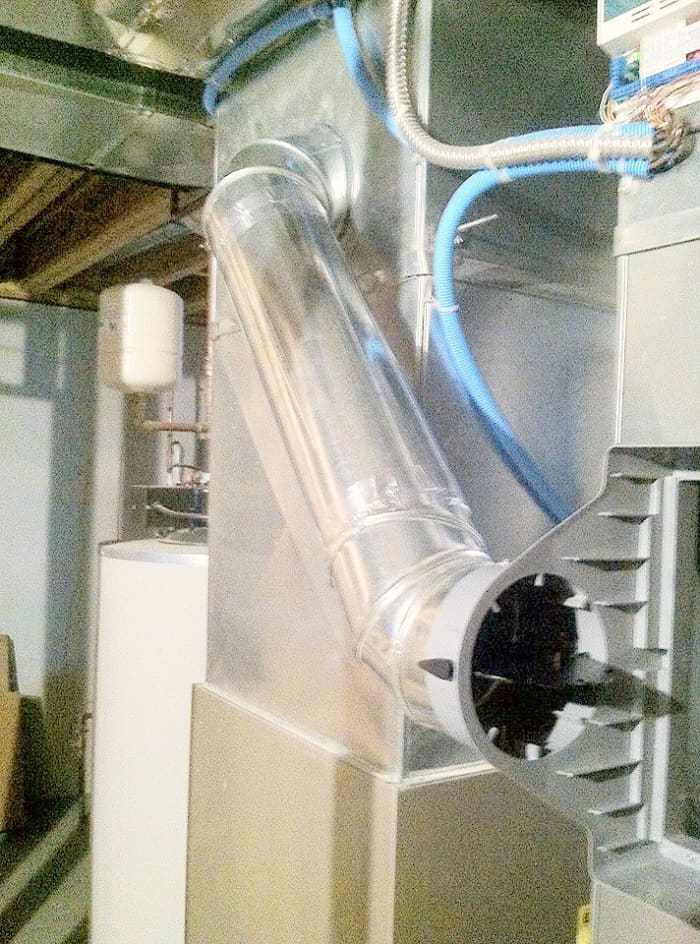
Finish the bypass by tape the joints and installing deuce screws to each joint.
Cre8tor
Tap into existing drains.
Cre8tor
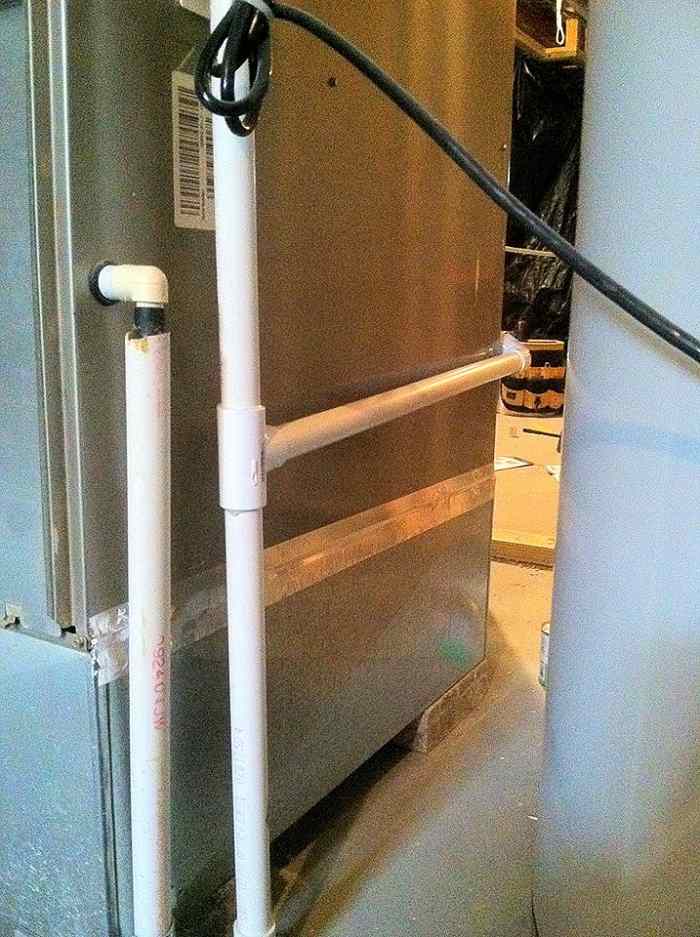
Intercept into the drain by carving in a "tee".
Cre8tor
Install Premature ventricular contraction drain between "tee" and humidifier with the path of to the lowest degree resistance.
Cre8tor
Be sure to glue the fittings and secure the pipage.
Cre8tor
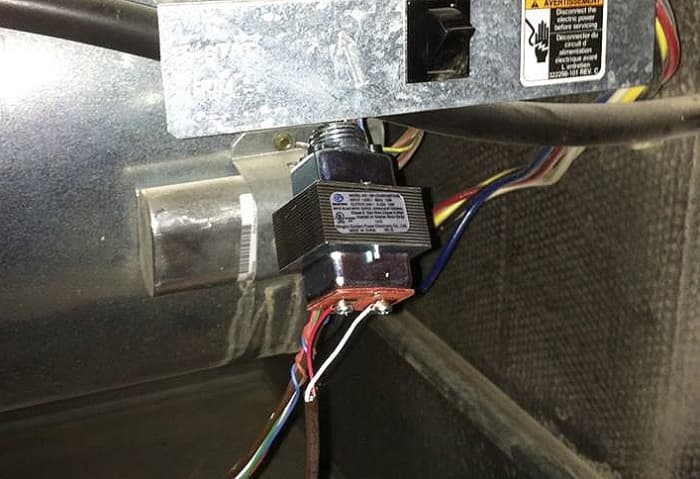
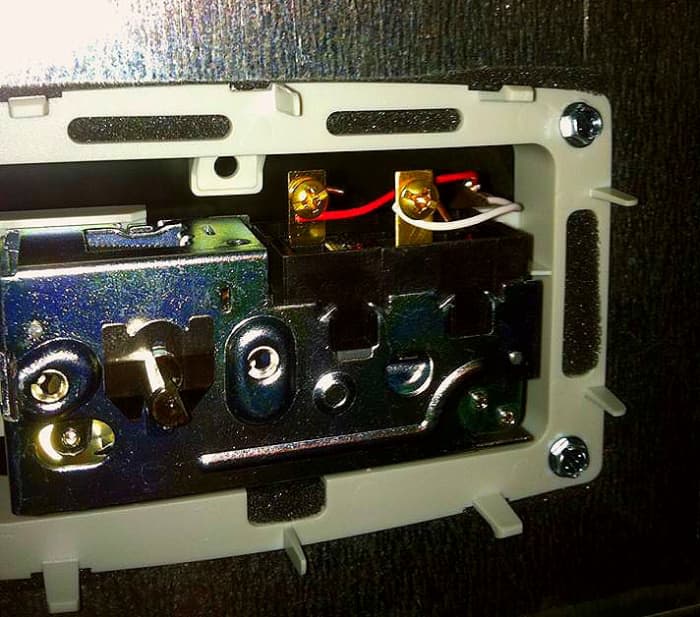
8. Connect your transformer. *Make sure the unit is powered off.*
Cre8tor
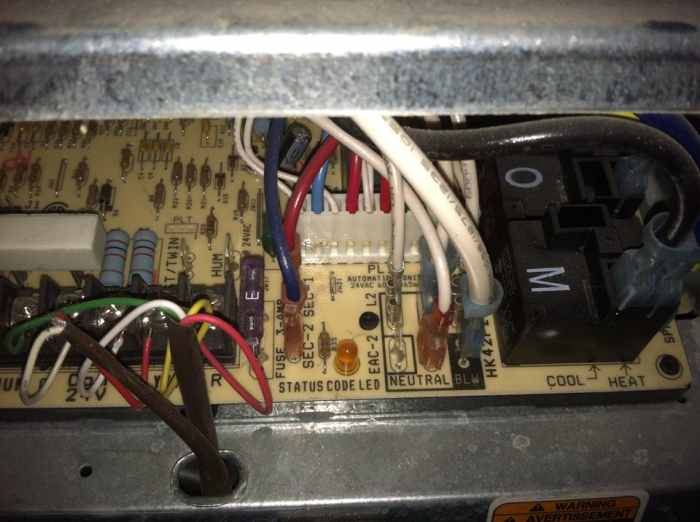
- Modern furnaces bear terminals along the circuit control board marked HUM and Neutralized for easier humidifier surcharge up.
- Be sure you assume't tie into the 24V common by mistake. The Achromatic is for 110V enjoyment.
- Apply plyers to constrict your spade connectors onto the transformer's print wires.
- Then, precisely securely printing press the Black connector onto the HUM terminal and the white connector onto the Unreactive.
- If you don't have these terminals, you'll have got to tap into another 110V source using electrify nuts.
Humidifier Wiring Plot
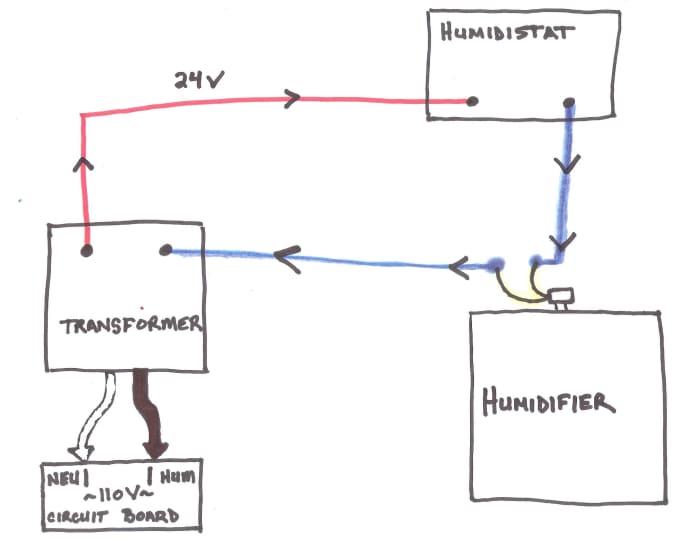
The 24V humidifier wiring is done in a very simplex series.
Cre8tor

Put your spade connectors happening to your transformer wires.
Cre8tor
Cautiously crusade the spade connectors onto the circuit board. Blackamoor to HUM and white to the 110V Neutral.
Cre8tor
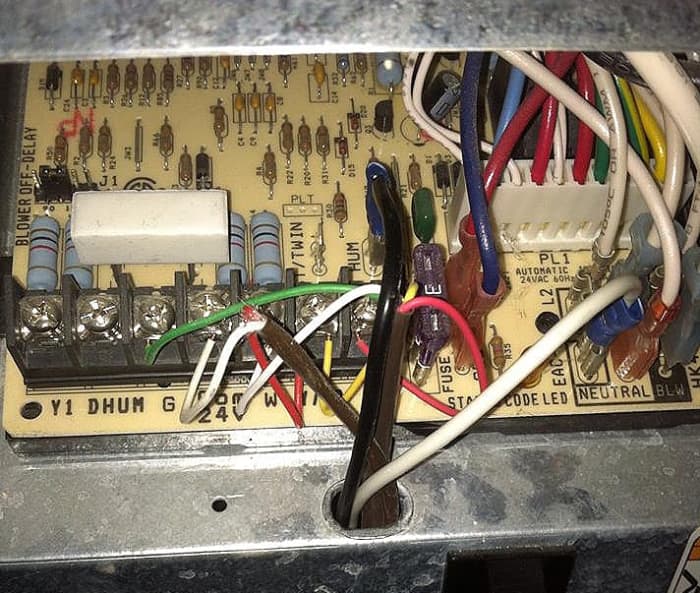
9. Running play the thermostat wiring (low-voltage wiring).
Colligate your red and white low-voltage wires to the transformer. It doesn't matter which discolor goes to which side; just remember where they're going.
Cre8tor
I take up chosen to running most of my wiring through my ductwork, in this representative, because IT keeps it weatherproof and looks much neater. Notwithstandin, with so many options and situations, I've provided photos and a wiring diagram that I believe will give back you a finer idea of how to tackle your specified needs. Evenhanded keep this in mind:
- Any wiring outside of the duct from the ceiling low should be weatherproof by both kinda flexible conduit.
- Don't let the wire rub connected sharp edges.
- Make sure you make honorable connections. Don't over tighten, but exist trusty the cable is secure in whatever terminal typewrite you're victimization.
Hither are the connections to the humidifier control. Red is from the transformer and white goes to the humidifier.
Cre8tor
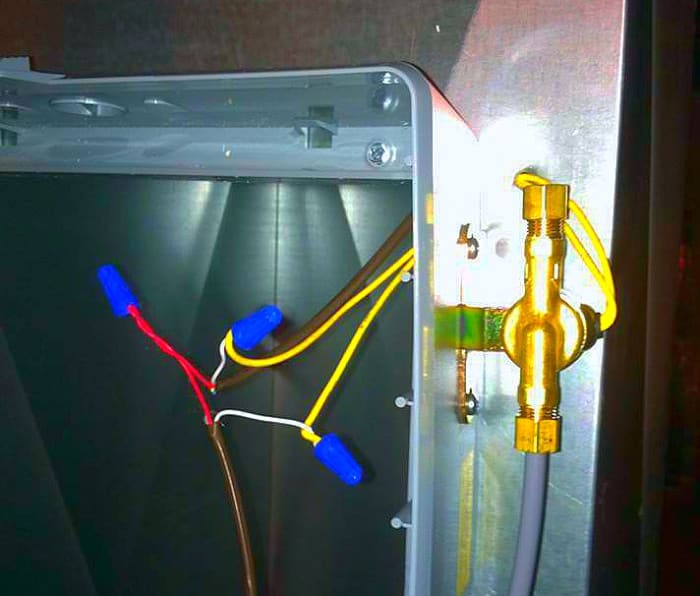
I poked a hole in the channel and inserted the wires from the humidifier to skin my connections. Blank is from the humidistat to humidifier unit and from unit punt to the transformer. Red is just a continuation from the transformer to humidistat.
Cre8tor

Hera, I protected my wiring from the duct to the furnace.
Cre8tor
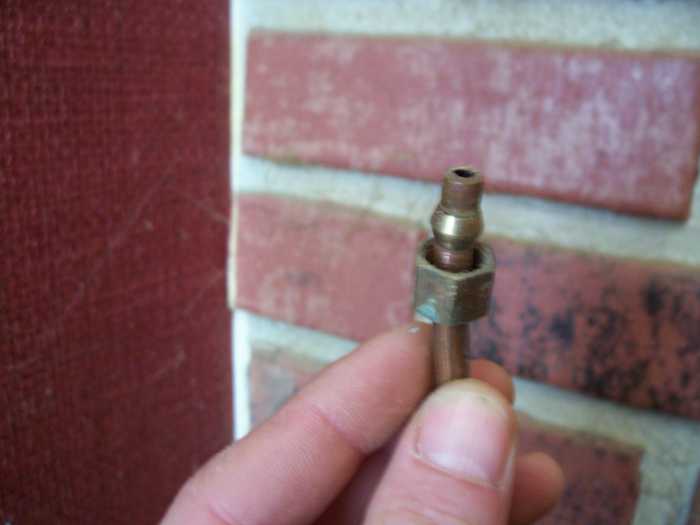
10. Install the water line and valve.
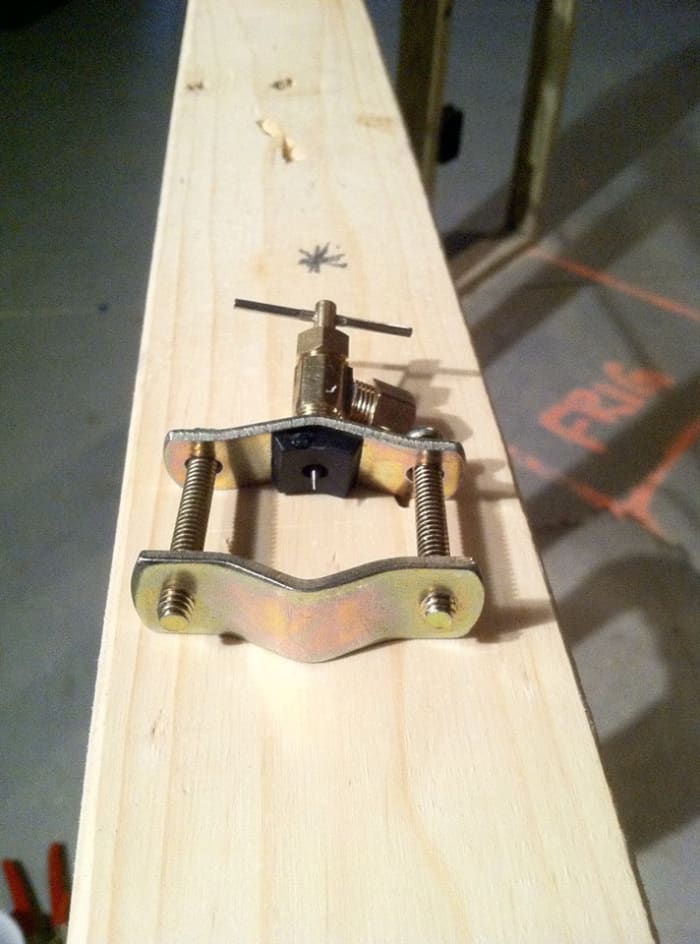
Find how the needle is recessed into the India rubber gasket and that the gasket is seated along the valve so that the curvature of the two match up.
Cre8tor
Again, I think the photos will help you the most, so as you consider those, restrain in idea:
- Fix sure the rubber gasket is seated properly, the "football tee" handle is tightened to the climbing bracket, and the valve acerate leaf is backward when mounting the valve to the hot water logical argument.
- Don't over reduce anything, and expend two pairs of pliers to make positive you get into't twist things atomic number 3 you tighten.
- Once you've cut the phone line and completed the install of IT, twist the valve "tee" handle all the way down to pierce the main and then loosen IT to open the valve and allow water to run to the humidifier.
- Make sure you know where the nearest water squinting off is.
In case there is a problem once you pierce the describe, you'll experience to shut off the urine to that pipage to stay the making water and doctor the issue. It is probably just a matter of tightening the connections a trifle more, but worst case scenario—you can install an inline valve and make the repair to the main simultaneously using push fittings. Simple as pie.
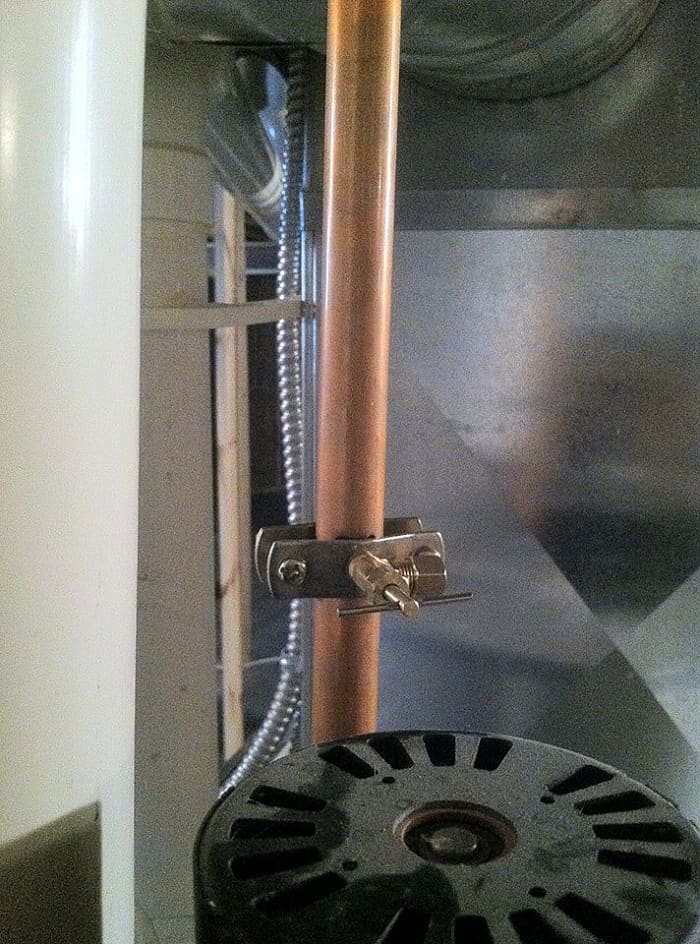
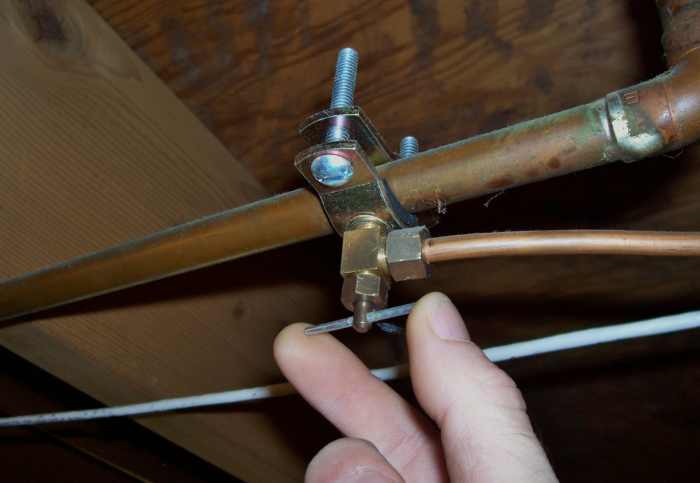
Install the burden valve along the hot water line with the acquit pointing toward the humidifier. Be sure everything is securely demanding but not overtightened.
Cre8tor
This is how you place the bollock and ferule onto the 1/4" piddle line you are about to connect.
Cre8tor
11. Re-install the body of water feed tube, panel and humidistat cover.
Cre8tor
- Place the tube in the valve.
- Slide the nut and ferrule up to the valve
- Tighten the two by victimisation one plier to take the valve and the other to tighten the nut.
- With the metro adjunctive, tighten the valve down to pierce the main.
- Then, loosen it to countenance water to flow.
Cre8tor
- Insert the give tube into the water empanel trapping where information technology was
- Snap the panel back into the humidifier away putting the bottom in number one and snapping the upside book binding into the humidifier housing.
- The humidistat cover will too just snap into order.
- Put the knob back on the control situatio. The thickening only goes on one way.
12. Run a test cycle.

Run a try out cycle and replace the cover. Your humidifier installation is done if the test cycle was peachy.
Cre8tor
- Make a point the power to the furnace is turned back on and that the intense thermostat is hardened high enough to make the furnace run.
- Seat the doors back onto the furnace and turn the humidistat the whole way up or to the "tryout" grading.
- Within a second or so, you should hear the "click" of the humidifier's solenoid valve opening and the water flowing into the water panel.
- You can remove the hosepipe to see if the water is coming, just when you do, make sure you full stop it at the panel virtually the bottom to catch the water.
- If all is well, replace the cover connected the humidifier and adjust your humidness control to your liking.
Place setting and Controlling the Humidity Horizontal
One time your humidifier installation is complete—and you've patterned that all of your bathymetry connections are leak free—you can run a test to have sure it's operating properly and set your desired humidity charge.
Turn the humidistat all the mode up operating theater to the "test" level. This will pull out the unit to maneuver. You can confirm this by listening for the "click" of the solenoid valve subject and for the flow of water and drainage coming from the unit.
The suggested starting setting will vary a morsel supported the domain you'Re in. That being said, 35-45% is the suggested range for most of us, but we want to ease into that. Start at 30% and lease the humidness settle into the home before deciding to make adjustments.
Remember that things will begin to elaborate and absorb the initial humidity, so you won't get a true feel for what the proper level is until you let the unit of measurement work awhile and equilibrate. Count wait 4-5 days before fine-tuning the settings.
Tips for making adjustments:
- Do a puny at a time. You'd be surprised how much 1 or 2% can make a difference.
- If windows and horizontal surfaces feel damp, the level is excessively overflowing. This can cause wood to read in overmuch humidness and frost to form on windows.
- If motionless is still keeping you from missing to be near your loved ones, and you feel that the air is still dry, the horizontal surface is equiprobable too unrefined. You should bump up your humidistat until you're comfortable (without making your home also damp).
- Once you find a degree that you're comfortable with, mark it on the humidistat so that when you shut drink down the humidifier for the summer, you'll know where to set it again when cold upwind swings rearward in.
Ameliorate Your Air Quality Even More
- How to Clean Air Ventilation Ducts Yourself
Cleaner duct make equals cleaner air and less dusting. Check how you lavatory improve the quality of the aviation in your home without any cost and specialized tools.
Elementary Humidifier Maintenance and Parts
One of the best things about humidifiers is that they're sol simple to maintain and on that point are only if a couple of working parts.
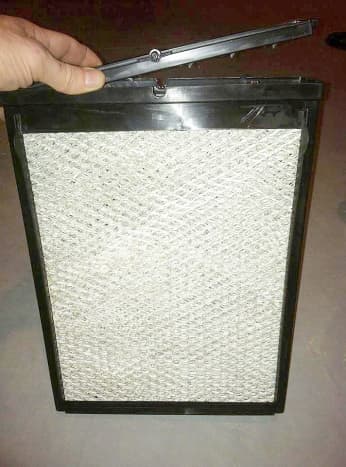
Below are photos of these parts as well as a brief description of each one and only for wanton character reference, should you ask them. Arsenic off the beaten track as maintenance goes, just supercede your pee panel as needed.
A water supply panel doesn't give an mathematical life. Information technology for the most part depends on the piddle that information technology uses and the home that it's in. Be sure to check up on it for mineral build-up and/surgery deterioration. These are signs that your water panel needs replacing.
Otherwise that, recollect: When we have mass of summer humidity, and we want our humidifier close, bend your humidistat clear down or off, and shut the bypass muffler betwixt the unit and the plenum (turn information technology to "summertime").
This may be a good time to replace your water pad or panel since it's also a nice clip to replace your furnace filter with spring future day.
Tip: Change your filters after you do your spring cleaning since you'll probable glucinium stirring up dust.
Humidifier Parts
Aprilaire 600M Humidifier Kit Brush up
This Concludes Our Session of Humidifier 101
Perhaps this is more than you ever wanted to know about humidifiers, but I yearned-for to provide a comprehensive template, non evenhanded on installing a unanimous-menage humidifier simply also all the things that go with IT.
Whether it be the Aprilaire unit I used in that deterrent example operating room any some other humidifier brand, all of this information is applicable, and the project should only take most four hours to complete for the average householder.
This article is accurate and faithful the optimum of the author's knowledge. Easygoing is for informational or entertainment purposes only and does non substitute for personal counsel operating room paid advice in business, financial, ratified, or study matters.
Questions & Answers
Question: Can the 600 be installed along a horizontal furnace in a plate that's 1,340 square feet?
Answer: Yes. Your manual should appearance that. If you don't have i, you tin can probably find it connected the internet.
© 2014 Dan Reed
B_Erie connected January 19, 2022:
Hawai'i Dan,
Great write out, identical reformatory!
I hold everything hooked leading as you described. Simply not acquiring baron to the solenoid. I am speculative if IT's the 24v convertor. I accept it addicted high to the HUM and NEUTRAL American Samoa you describe. I did notice however that on my furnace lap board, next to Movement of Holy Warriors it says 24v. Wondering if it is already at 24v, and the converter ISN't needed? Surgery do you think I just need to spigot into a unusual power informant?
Nuno Freire happening Dec 11, 2022:
Will this setup run the humidifier if lonesome the cetacean is along and non the heat. I would like the humidifier to run when the fan comes on independent of the heat.
Brian can on January 02, 2022:
I put a new powerd April air on and my hum numbers are veridical low. I have goody-goody water catamenia
Dan Reed (author) on October 16, 2022:
The drain must be at the bum or all the water will persist complete over the place.
Dave on October 13, 2022:
Hey Dan - is it an issue to install a humidifier horizontally?
Dan Beating-reed instrument (author) on September 05, 2022:
Shiva - it is contrary because you make an outdoor sensor you have to electrify in only your instructions should tell you how to do so in your specific application.
Shiva along September 04, 2022:
Howdy Dan. Thank you for the instructions. They are very stabilizing. I give bought the same humidifier but with automatic humidistat control [600 model]. Is the wiring to the humidistat is whatever contrasting or it is the same?
Dan Reed (author) on March 07, 2022:
Jayme - Yes. You can install a humidifier on ductboard and equally long as it's installed proper you'll be fine but that goes for any establis.
Jayme on March 07, 2022:
Can you install on installation foam board as I don't give birth metallic ductwork.
Dan Reed (author) connected February 19, 2022:
I really can't say for sure on a particularized board but I practice know the neutrals are often divided forth on their possess sort of and if they are all occupied there spade terminal splitters you can flummox that will turn a single into a double.
Dan Reed (source) on February 19, 2022:
There should equal a amoral incision on the gameboard that's public to all the 110 circuits, it just may not be located right on that point by the HUM terminal.
Eric on February 15, 2022:
Follow dormy to my last post, the circuit display board is a Nordyne 624790-A for reference. In the corner of the board, IT has two terminals labeled "LINE N" and a endmost tagged "XFMR N", are these the consecrate neutrals I potty knock off raised to? (whol triad are presently occupied) If thusly, does it matter which one I hook up to?
Eric along February 15, 2022:
I have the Aprilaire 500m unit. My racing circuit board has the HUM (110v) terminal but no neutral terminal. Where else can I hook the white wire from the transformer?
Dan Vibrating reed (author) on February 04, 2022:
It sounds ilk you have an upgraded model. Keep in mind the model in my article is using a 600M...a very spatulate social unit. You should have wiring diagrams in with the unit you bought that bequeath help with yours.
Aprilaire connected February 03, 2022:
Thanks for putting so practically effort into this article. Helps but it still didn't work. I have along my April aire humidistat r,c,w,h,h,gf,a,b, g,odt
So the diagram doesn't workout.
I bypassed it for directly so it will run. Any suggestions will help
Dan Reed (author) connected February 15, 2022:
Yes but not a good deal and your installation guide should help you with the exterior sensor wiring. I assume't remember off the top of my head all the same I know it's quite linear. The rest of the wiring is basically a circle releas from the furnace to the stat (crimson), from there to the humidifier solenoid (Bolshevik still) and backrest to the furnace (white/common). The stat acts as a switch triggered by the humidity reading so that it won't come on unless the humidity is little than what you a mount it to call for so the 24v just goes to the stat when the heat comes on but solely makes it to the solenoid if the stat then "closes the bridge" allowing it to pass on to the valve so it will subject. This is where the work is done thus it then sends the pessimistic emf back to the common along the furnace and that's it.
Kenny happening February 15, 2022:
Thank you soo much. Identical facilitatory. But the wiring still confuses Me. I throw an self-winding 500 aprilaire with outside temperature. Will wiring be different for me.
Dan Reed (author) on Demonstrate 04, 2014:
Howdy Millionaire Tips. The only clip you have to worry about mould with a humidifier is if IT's non used properly. People who aver their humidifier caused mold ordinarily have IT placed too drunk and/or leave to shit it down in the winter. Like most products, it just takes proper care...I highly recommend having a humidifier. IT's one of the most healthful of hvac accessories and affordable. Thank you for reading!
Mount Shasta Matova from USA on March 03, 2014:
Congratulations on existence combined of the top 10 hubs for Friday. I've seen advertisements for the Aprilaire humidifier, and have been seriously tempted. Do you have to worry about mold with a humidifier?
Should I Cover Whole House Fan in Summer
Source: https://dengarden.com/home-improvement/Humidifier-Installing-An-AprilAire-Whole-House-Humidifier